Engine Registry Overview
Dryad Engine uses a registry system to manage all the moving parts of your game. Think of it as a central directory where different systems register themselves so they can talk to each other.
This page explains each registry type in simple terms. For complete lists and examples, see the linked reference pages.
Viewing the Registry In-Game
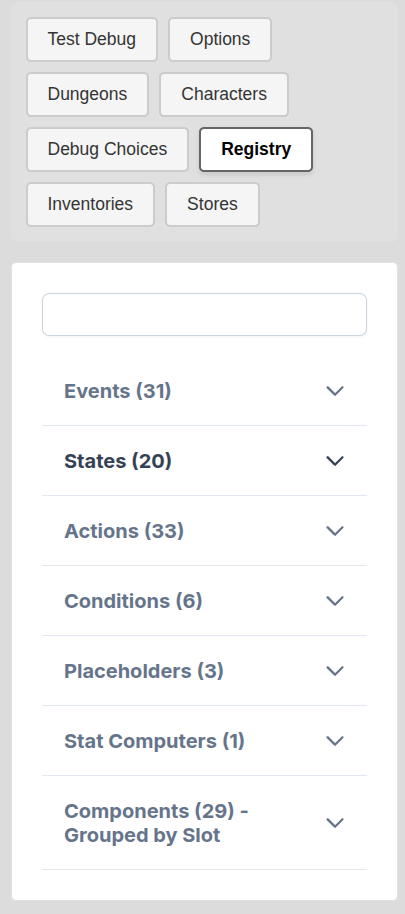
During development, you can inspect all registered items in real-time using the Debug Registry panel. When you playtest your game from the Engine Editor, the debug panel is visible automatically. Navigate to the Registry tab to see all registered emitters, states, actions, conditions, placeholders, stat computers, and components - including any custom ones you've added via scripts.
Lifecycle Emitters
What they are: Hooks that let you run code when something happens in the game.
How they work: The engine broadcasts emitters like "a character was created" or "the player entered a room". Your scripts can listen for these and react to them.
Example use cases:
- Play a sound when entering a dungeon
- Modify item prices when a shop opens
- Track statistics when characters level up
// Listen to a built-in emitter
game.on("dungeon_enter", (dungeonId, roomId) => {
  // Your code runs whenever a dungeon is entered
});

// Register a custom emitter
game.registerEmitter("battle_started");

// Listen to your custom emitter
game.on("battle_started", (enemyId) => {
  console.log("Battle with", enemyId);
});

// Trigger your custom emitter from anywhere
game.trigger("battle_started", "goblin");
Reference: Game Emitters
Note: These are game lifecycle emitters registered via game.on() in scripts. Don't confuse them with dungeon events (dialogues, scenes) which are content created in Google Docs.
States
What they are: Named values that control the UI and game behavior.
How they work: States are like switches or dials that different parts of the engine read. Changing a state can show/hide UI panels, enable/disable features, or switch between game modes.
Example use cases:
- Show the character sheet panel
- Disable the UI during cutscenes
- Switch between exploration and battle modes
// Register a custom state
game.registerState("battle_mode", false);

// Read a state
let isBattle = game.getState("battle_mode");

// Change a state
game.setState("battle_mode", true);

// Built-in states work the same way
game.setState("progression_state", "character");  // Open character sheet
game.setState("disable_ui", true);                // Lock the UI
Reference: States
Actions
What they are: Named commands that do things in the game.
How they work: Actions are reusable pieces of logic. You can trigger them from dialogue scripts, item effects, or your own code. Built-in actions handle common tasks like giving items, changing scenes, or modifying flags.
Example use cases:
- Give the player gold
- Start a scene or dialogue
- Add/remove items from inventory
// Register a custom action
game.registerAction("heal_party", () => {
  for (let char of game.getParty()) {
    char.setResource("health", char.getStat("health"));
  }
});

// Trigger your custom action
game.execute({ heal_party: true });

// Trigger a built-in action (> adds, < subtracts, = sets)
game.execute({ flag: "gold>100" });
Reference: Actions
Conditions
What they are: Named checks that return true or false.
How they work: Conditions let you test game state in a reusable way. Use them in dialogue branches, to show/hide choices, or anywhere you need to check "is this true?"
Example use cases:
- Check if player has enough gold
- Test if a character is in the party
- Verify quest progress
// Register a custom condition
game.registerCondition("can_afford", (amount) => {
  let partyInv = game.getInventory("_party_inventory");
  return partyInv.getCurrencyAmount("gold") >= amount;
});

// Used in dialogue: if{can_afford(100) = true}You can buy this.fi{}
Reference: Conditions
Placeholders
What they are: Dynamic text substitutions.
How they work: Placeholders let you insert values into text. Write |placeholder_name| in your dialogue or descriptions, and the engine replaces it with the actual value at runtime.
Example use cases:
- Show character names: "Hello, |player_name|!"
- Display resource values: "You have |flag(gold)| gold"
- Insert item names in descriptions
// Register a custom placeholder
game.registerPlaceholder("player_name", () => {
  return game.getCharacter("mc").getName();
});

// Used in text: "Welcome back, |player_name|!"
Reference: Placeholders
Stat Computers
What they are: Functions that calculate derived character stats.
How they work: Some stats depend on other stats or complex formulas. Instead of storing them directly, you register a function that computes the value whenever it's needed. The function returns an object with stat names and their bonus values.
Example use cases:
- Calculate damage from strength and equipment
- Derive max health from level and constitution
- Compute defense from armor pieces
// Register a stat computer
game.registerStatComputer("strengthBonus", (character) => {
  const strength = character.getStat("strength") || 0;
  return {
    attack: strength * 2,
    carry_capacity: strength * 10
  };
});

// Attach it to a character template in the editor:
// computed_stats: ["strengthBonus"]

// Then access the computed stats normally
let mc = game.getCharacter("mc");
let attack = mc.getStat("attack");  // Includes the strength bonus
Reference: Computed Stats
Components
What they are: Vue components plugged into UI slots.
How they work: The engine UI has designated "slots" where components can appear. You register your own components into these slots to add tabs, buttons, panels, or entirely new screens. Slots automatically pass context props from the parent component to your custom component.
Example use cases:
- Add a custom tab to the character sheet
- Insert a button into the toolbar
- Add action buttons to ability cards
const { vue, game } = window.engine;
const { defineComponent } = vue;

// Create a component that uses context props from the slot
const UseAbilityButton = defineComponent({
  props: ['abilityId', 'characterId'],  // Received from slot context
  setup(props) {
    function useAbility() {
      const character = game.getCharacter(props.characterId);
      character?.useAbility(props.abilityId);
    }
    return { useAbility };
  },
  template: /*html*/`<button @click="useAbility">Use</button>`
});

// Register into a slot
game.registerCustomComponent({
  id: "use-ability-button",
  slot: "ability-card-footer",
  component: UseAbilityButton
});
Reference: Components Export and Custom Vue Features
How It All Connects
These systems work together to make your game extensible:
- Event Emitters notify you when things happen
- States control what the UI shows
- Actions execute game logic
- Conditions gate content based on game state
- Placeholders make text dynamic
- Stat Computers derive calculated values
- Components extend the UI
Your scripts can register new items in any of these registries, letting you extend the engine without modifying its core code.
Next Steps
- Game Emitters - Full emitter reference
- States - All built-in states
- Actions - Action reference
- Conditions - Condition reference
- Vue Components - Creating custom components